Showing posts with label Living Room. Show all posts

Home Tour: The Living Room

This past summer, I finished up making over our living room.  When we had first moved in, it held the furniture from our old living room, which didn't fit the style of our current house.

Monochromatic Living Room

The makeover began by purchasing the Carmen Sofa from Pier One & a cheap coffee table I spray painted gold.

Carmen Sofa

Gold Coffee Table Accessories

I made my own pillows…

DIY Pillows

and made artwork from free printable images.

DIY Botanical Art

An old china cabinet got a new life with a coat of paint & some mirrored glass,

China Cabinet Makeover

and I tackled my first re-upholstery job on an old pair of chairs.

DIY Upholstered Chairs

I refinished my great-grandmother’s table & learned how to style it.

Styling a Round Table

And then my husband & I reupholstered a $40 pair of antique chairs with drop cloths.

Reupholstering Chairs

We are still pretty proud of ourselves!

Drop Cloth Chair

If you need a refresher, here is how the room looked after we moved in:


And here it is today:

Neutral Glam Living Room

To find links to all the projects & sources for this room, click here.

Thanks so much for joining me on today’s room tour!  I hope you’ll stop back on Thursday to see more of the dining room.

Revealing the Living Room

Now that both chairs have been recovered, it is time to reveal the living room!  Before we get to the good photos (Ha!  Who am I kidding?  My pictures are never good!)  we should take a minute to see how far this room has come…


For the first year we lived here, this room was filled with the furniture, accessories, & curtains from our former home.  The result didn't seem to fit the look I was going for & it definitely felt a little more formal & a little less like us.

IMG_8736 - Copy

Believe it or not, the only furniture we bought new was the sofa & coffee table.  Everything else was originally bought used, & the only used furniture we bought for this room were the chairs by the windows, but I'm getting ahead of myself!  (Bonus points if you spot the baby doll creeper!)

IMG_8723

After painting the walls Dusty Trail by Olympic Paints (found at Lowe's), we purchased the sofa & coffee table, which got a few coats of gold spray paint.

IMG_8724

Believe it or not, but the botanical prints above the sofa were actually free printables!

IMG_8725

You can read about how I made the chevron & fur pillows here.  The tribal print pillow fabric came from Spoonflower.

IMG_8727

Normally, this coffee table is styled with toddler-proof accessories, but today I switched them out for a glass candle holder from Wal-Mart & a thrift store vase.  (Pretend you don't notice the upside down book...)

IMG_8726

The furniture across from the couch was all purchased second hand.

IMG_8719

We gave the china cabinet a makeover by taking some moldings off the top that were in disrepair, painting it black, & adding a mirror so we could use it for storage, rather than as a display.

IMG_8722

I've heard it said that every room needs black & an animal print.  I covered both of those "dos" in this section of the room!  You can  read my chair re-upholstery tips here.

IMG_8731

The turquoise pillows were a quick & cheap DIY using cloth napkins.

IMG_8718

This view of the room is so much nicer...

IMG_8730

now that I have these two chairs reupholstered!  The throw blanket is from Ikea & I made the pillows from this Spoonflower print.

IMG_8729

I styled the table using a Target lamp, dollar tree frames, & a thrifted swan.

IMG_8720

The curtains were adapted from these.

IMG_8733

I am totally loving this room!  Although it is mainly monochromatic, it doesn't look boring because there are a variety of shades & textures used, along with happy pops of color in the accessories.  I hope you enjoyed the tour!

Linking to Remodelaholic

Best of the Nest

Thrifty Decor Chick

Reupholstering Chairs

After two years of living with these chairs:


I am happy to report that one of them has been successfully reupholstered!  A few weeks ago, I had given up on re-doing them myself & got permission from my husband to take them to a local upholstery shop.  I decided I should stain the the wood on the chairs first, since it was in pretty bad shape. 

20140609_172958

After a quick sanding, I used a small paintbrush to cover the wood in one coat of Minwax Polyshades in Tudor with a satin sheen. 

Then, I called the upholstery shop & was told it would cost around $550 per chair!  Yikes!  Needless to say, after hearing the price tag, Mark came home from work & immediately started stripping the fabric off one of the chairs!  (You can see how nice & dark the wood is now in the photo below.)  We decided to work one chair at a time so we could use the other chair to reference how it had been upholstered.

20140627_160001

When it came time to put on the new fabric (a 6’x9’ drop cloth) we started with the inside back.  We used the pieces we removed as a pattern & cut each piece out as we went. 

We folded the fabric back to prevent fraying & then put a nail in the middle of the top & worked our way out.  We had to pull the fabric through the sides & bottom & then stapled it to the back.  Next we used the same approach for the insides of the arms.

IMG_20140614_151522

We then laid the fabric on the seat bottom & pulled the back through the crack (not sure what to call that!) & stapled it to the back.  We did the same thing to the sides.

20140614_191553

To get a nice seam in the front, I cut a long strip of cardboard from a box of canned drinks.  With fabric folded underneath it, we stapled it to the bottom front of the chair & once we had the top part finished, we stapled it under the chair.  I’m pretty sure that doesn’t make sense, so here is the video we watched.  You’ll see him do it around 3:30.)

DSCF2882

Next, we tackled the outside sides, which were fairly simple. 

IMG_20140620_220903

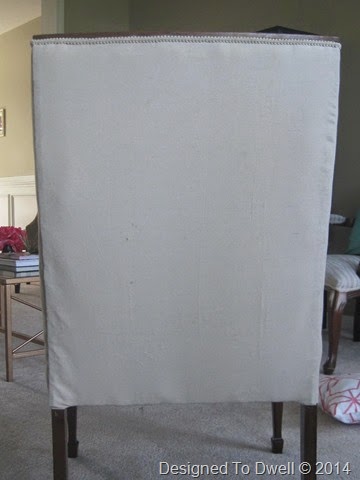
The part that had us worried the most was the back, since we couldn’t just nail the back sides into the wood, since we weren’t going to cover that part in trim.  We ended up putting a few staples in the top, middle, of the back & working our way towards the side.  When we got close to the side, we used these upholstery tack strips to give us a nice, clean, staple free edge.  Before using them we watched this video to figure out how to use them.  It ended up being the easiest part of the entire chair!  (I’m just holding the tack strip up next to the finished chair so you can see where we held it.  Then we punctured the fabric & folded them 180 degrees away from the chair & nailed them in with a rubber mallet.)

 IMG_8704

IMG_8706

The final strip was gluing on the trim.  Originally, the chairs had double welting around them, but I don’t have much patience with my sewing machine, so I just bought some trim instead.

DSCF2879

I am so happy with how this turned out!

DSCF2855

One more to go!  Mark is stripping the fabric off the other chair as we speak!  Hopefully, we’ll have a living room reveal soon!

DSCF2883

The View From Here

Sometimes when I'm sitting on the couch & I see this view, I see past the imperfections & it makes me happy!  The cheerful pop of the blue dresser & purple orchid reminds me of how much I like our house & how fortunate I am to live in a home this beautiful.

IMG_8700

When I see this after coming down the steps & turning the corner, it evokes that same feeling.

IMG_8701

The living room & dining room are also some of my favorite views in the house.  The pop of pink flowers & blue pillows with the shiny sunburst mirror & unexpected (but neutral) zebra print on the chairs are just a few of my favorite things in this space.

IMG_8698

Of course, this is one of my very favorite things to see in here!  Most people say they don't use their formal living & dining rooms, but we definitely use ours every day.  The covers on the dining room chairs make for a great hideout (much to my chagrin), & obviously there are races through these rooms, & Zeke usually lays on the couch to read, away from distractions in other rooms.

IMG_8689

Another favorite spot... but I'm usually the one in the chair (probably a little too much)!

IMG_8697

I'm so glad to have a few spots in my home where I can see past the linoleum floors, oak railings, & dirty carpets!  So, what's your favorite view at home?

$5 Decorating: Making Pillows from Dinner Napkins

Since I have about $0 to spend on decorating right now, I have been planning ahead for purchases I want to make as soon as we pay a few big bills.  In particular, I have been searching for pillow fabrics for the living room.  I think I finally have it narrowed down. 


I plan on keeping the chevron & white fur pillows on the couch, but will hopefully be ditching the small fuchsia pillows for larger ones in this fabric. 

I decided to add some solid turquoise pillows to the zebra chairs & totally remembered, during my online window shopping session, that I had purchased a set of turquoise cloth napkins from Ikea.  (Unfortunately, I couldn’t find them online.)  I’m pretty sure I spent between 4- 5 dollars on the set.  After a quick treasure hunt, I sewed the napkins together & had a cheap set of pillows.  (I just used some old inserts to fill them.)

IMG_8480

Pretty nice for only $2.50 each!

IMG_8481

I plan on using this fabric on the chairs in front of the window (that I have yet to re-cover) which will tie the blue, pink/coral colors together hopefully!

So, do you have any $5 decorating secrets?  I’d love to hear them & maybe even feature them on the blog!

Making a Statement… With Chairs!

Recently, I've been thinking a lot about the living room.  There are only two things left to cross off my list before I can call it “finished” (for now).  I have probably been dragging my feet on recovering these chairs for at least a year & a half!

IMG_8440

I bought the pair for $40 at a local antique store.  I really love the clean lines & exposed wood on them.  I have never seen a pair of chairs exactly like them, which also makes them very special!  After doing a bit of research on the new One Kings Lane Home Décor Resource Page I was able to determine that they are probably some sort of reproduction Louis XVI Bergere chair.  The store I bought them from considered them antique, but I’m not quite sure they are from the 1700’s!  I’m so glad to finally have a little knowledge about this chair. 

If you haven’t checked out the resource page, I encourage you to look at it.  It might take you a few minutes of investigation, but I think you’ll notice that there is a wealth of information there!  Here is another article I found on choosing the perfect statement chair.

Anyway, back to my chair…  I’m really hoping to put my big girl panties on this week & start on these lovelies!  My plan is to re-stain the legs a dark walnut color & cover the chair in canvas.  I think the contrast will look very sharp, similar to this chair:


The canvas fabric will help lighten up this wall & bright pillows will really pop on the chairs!
You may recall that I recovered another set of chairs for the living room over the summer.  I will definitely be looking over that experience so I don’t make any of the same mistakes on these chairs! 

IMG_8428

In case you forgot what the rest of the room looks like, here’s a peek:

IMG_8432

So, do you have any statement chairs in your home?  Have any encouragement for me about recovering chairs?  I would rather just pay someone to do it, but kind of feel like it would be cheating & would rather be saving my pennies for some other projects!  I’m scared!  (What a way to end a blog post!)

LinkWithin

Related Posts Plugin for WordPress, Blogger...