Mirror, Mirror, on the Wall

I had been wanting a bigger, rounder mirror for my entry way.  (I am a straight lines kind of girl, & am trying to incorporate more curves in my home decor!)

Anyway, I stumbled upon this $10 36-inch beauty at my local Goodwill. 

{Before}

I painted it Wal-Mart's Color Place Country White, and here it is now...

{After}

Here is what the other, shorter mirror looked like...

{OOPS...I thought I had a better picture of this mirror, but apparently, this is the best I've got!}

You may have noticed some other changes in the entry way, but you'll have to wait to see those.  It is definitely a work in progress, & I just decided I wanted to add some chair rail & wainscoting, so who knows when it will be finished!  So much for my goal to have it finished by the end of the summer!


  My Uncommon Slice of Suburbia


Homemade Laundry Supplies

So, a few weeks ago, I got the urge to make my own laundry supplies.  So many people are making their own detergent, not only to save money, but because it can be greener, gentler on skin, & work better!  That's enough for me.  The cheap "name brand" detergents I usually buy didn't seem to be getting my kids' clothes that clean, so I decided to try my hand at making my own.

I scoured Pinterest for the easiest & most stain fighting recipes I could find.  I'm not going to list the recipes, since they are not my own, but I will show you my supplies & give you the links to the original recipes & share my thoughts on them.

Homemade Laundry Soap from Being Creative To Keep My Sanity

{Laundry Soap Supplies}

This is a pretty easy thing to make.  The parts that took the longest were opening all the boxes & trying to find my cheese grater, which I apparently gave away...oops!  To make this, you first grate the Fels-Naptha.  Since I couldn't find my grater, I ended up using my tiny food processor.  It worked fine & only took a few minutes.  Then, dump all the ingredients in a 5-gallon bucket & mix them up.  Add 1-2 tablespoons of this detergent per load.

I found all the supplies for this detergent in the laundry aisle at my local Wal-Mart.  I threw my receipt away, but I'd say I spent around $15 to make this, & according to the original source, it should last around 9 months (if you do 8 loads per week using 2 tablespoons per load).

The Verdict:  I found this detergent to work as well, if not better than my regular detergent in my front loading washing machine.  The only stains that have not come out of my kids' clothes were from the clay mud we have here, but my normal detergent never got those out either. 

A Word About Fels-Naptha Soap--- The father of the flower girls for my wedding is an artist.  When we had the girls try on their dresses, the dad picked one of them up, & got oil paint on one of the dresses.  Yikes!  He told us that using Fels-Naptha soap on the paint should remove it.  My mom tried it, & sure enough, you couldn't even tell it ever had paint on it!  If nothing else, it would probably be a good idea to keep some of this on hand for stain treatment, just in case!

Homemade Oxy Clean from Thrifty & Fabuless

{Oxy Clean Pre-Treatment Supplies}

This is another quick & easy recipe.  Basically, you mix together water, peroxide, & baking soda.  I put them in an old dish soap bottle, so I could squeeze them onto the stains.

To use, shake up the mixture (the baking soda usually settles at the bottom) & squeeze onto stains 20 minutes before laundering.

The Verdict:  This did a great job getting the berry stains out of my daughter's shirt.  I have been using it for a couple of weeks & have been pleased with the results!  Not bad, for a very CHEAP stain remover!  You may want to check the labels or test certain fabrics in an inconspicuous area.  I'm not sure if peroxide is safe for all fabrics, but so far, I haven't had any problems.

Homemade Fabric Softener from a friend's facebook page

{Fabric Softener Supplies}

Ingredients
2 cups inexpensive hair conditioner
3 cups white vinegar
6 cups water

Mix ingredients together & add to the fabric softener dispenser of your washing machine.

The Verdict:  I used a capful from an old bottle of fabric softener.  This seemed pretty watery, so I didn't dilute it.  I was kind of disappointed in the fabric softener.  It didn't make my clothes smell pretty & some of my husband's basketball shorts still had static cling after drying them.  Maybe using different conditioner or less water would help.  I rarely use fabric softener, so I'm not sure if I will make this again, but I will definitely use up the two containers that it made!

Well, that's it!  Have you tried to make any of these supplies?  What were your results?


Weekend Bloggy Reading

  My Uncommon Slice of Suburbia


Touches of Fall

Here are some simple touches I added to our home's decor to recognize the autumn season...

{Front Stoop}

It finally stopped raining long enough to get some decent pictures of the front porch.  I made another corn husk wreath inspired by Vanessa At The Picket Fence.  I also replaced the dead plants in my urns with some beautiful yellow mums.  I promise I'm going to water these! (Although, I may not have to worry about it with all the rain we've been getting lately!)  The final touch was a couple of pumpkins.  Nothing says fall to me like the colors red, yellow, & orange.


Besides the fall mantle, I also added a few seasonal touches to the interior of our home.

{Family Room}

In the family room, I replaced a green moss ball with a raffia pumpkin & added a stem of purple berries to the vase on the toy self behind it.

{Morning Room}

I had a hard time coming up with a fall centerpiece for the kitchen table.  I finally settled on adding a pumpkin to a white bowl & adding some peach & orange berries around it.  I also added some more glittery Dollar Tree pumpkins to the candle holders.

{Kitchen}

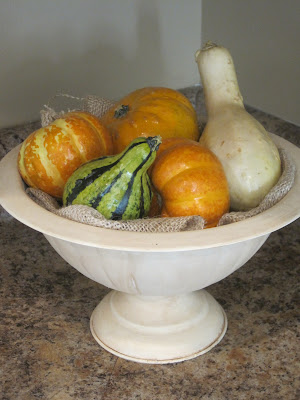
I bought a bag of fall produce that I thought I would use for either the mantle or the table.  After deciding I didn't like it in either of those places, I added some burlap to the bottom of our fruit basket in the kitchen & arranged the pumpkins & squash on top.  This turned out to be the perfect place for them!

I did add a few other pumpkins around the house...not exciting enough for pictures though!  I hope you enjoyed our touches of fall!

Wendy

Sharing here:

Door Decor Party at Southern Hospitality

     Photobucket    The DIY Show Off

It's Fall Y'all!

Happy second day of fall! 

Instead of decorating for Halloween & Thanksgiving, I usually just put out some fall decorations.  Honestly, I didn't really decorate at all for the fall holidays (or really any holiday except Christmas) until last year.  Seeing all these blogs with fabulous fall mantles made me want to do the same! 

Here is what my mantle looked like this summer:

{Summer}

And here is what it looks like decorated for fall...

{Fall}

My main inspiration for this mantle came from the picture below from Martha Stewart. 

I loved the look of this corn husk wreath hung on the mirror by gold ribbon.  I originally saw this picture & a tutorial At The Picket Fence.  Vanessa described herself as "craft challenged" & made the project look pretty easy.  I decided to give it a try.  You'll have to check out her post for the full tutorial & to get some other ideas she had for the leftover corn husks.

As you can tell from the summer picture of our mantle, we don't have a mirror hanging above the fireplace.  I didn't want to spend money on a big mirror right now, so I decided to use some brown packing paper to cover up the oil painting.  I just cut it to size & used a few pieces of sticky tack to adhere it to the painting so it wouldn't get damaged.  I couldn't find any pretty gold ribbon at Hobby Lobby, so I used some gold tulle ribbon to hang the wreath to the back of the picture.  (I just duct taped it to the back.)

{My version of Martha's wreath}

I removed the candles from their holders & replaced them with some Dollar Tree glittery pumpkins I picked up last year.


On the other side of the mantle, I filled a glass vase with faux acorns, (from Wal-Mart) another glittery pumpkin from the Dollar Tree, and a few faux leaves.


I filled the space in between with more faux leaves & clear plastic acorns (both from Dollar Tree), pine cones, & some artificial berry stems I already had.


It's not quite Martha's version, but I really like the way my fall mantle turned out.  I think it is both simple & elegant, which is the style I'm after these days!

Thanks for looking!  I hope you were able to find some fall inspiration for yourself!

Wendy
Joining these parties:

                The DIY Show Off    The Lettered Cottage

Concrete Extension & Basketball Goal

Our son was really wanting a basketball goal (& quite honestly, so was my husband!), so we told him he needed to show us that he wanted one by practicing basketball.  My husband made a chart, & Zeke got a check mark for every 30 minutes he practiced.  He finished his chart around May, earning himself a basketball goal.

Before we could get the goal, my husband wanted to extend our driveway.  That way, Zeke would have more room to play basketball & we could fit more cars in our driveway when we have company.  (One of the downfalls of living in a cul-de-sac is that there is no street parking in front of our house.) 

Here is what our driveway looked like before:

{Before}

This picture was taken after we transplanted the ornamental grass, which used to sit to the right of the driveway, in front of the house.  It's brown now, but I really think it will come back in the spring.  (At least I hope so!)

Below is a picture with the driveway extension:

{After}


{The extension}

Now, I'm just hoping we get our money's worth out of this!  It's been in since Friday night, & I think Zeke has played a total of 15 minutes with it!  

Our Take on a Nature Playscape

For the past two years, I have desperately been trying to add some outdoor play areas for our kids.  I was so tired of our kids spending all of their outdoor time in the neighbor's backyard.  I wanted our house to be the "cool" house.  You know, the one where all the neighbor kids want to hang out.  Well, I think we have finally achieved that with this area of our yard!

{The Full View}

Our back yard is on a steep slope, so it wasn't quite possible to put a play set in the back.  Plus, it would have taken away from our beautiful wooded view!  After clearing away lots of tall grass, dead trees, & brush, we realized that this area in our side yard worked great!

Here's a closer look at what we added:

{Our version of a tree swing!}


{Hula Hoop Tent, which I begged my mom to make for my daughter's birthday!}


{Zip Line...We made it short enough that they have to lift their feet to go down.  It seems less dangerous that way, & they can always put their feet down to slow themselves!}


{The zip line is a hit with the neighbor boys!}


{Fallen tree balance beam}


{Tree climbing}


{We cleared a path in the woods that leads to the creek.}


{Posing on the path!}


{Giant Sandbox made from landscaping timbers}


{Bigger, messier view of the sandbox}


{We also have a picnic table which is great for snacks or for observing leaves & bugs!}

The great thing about this area is that it really gets our kids involved in nature.  They spend countless hours searching for insects, leaves, buckeyes, & other treasures! 

I'm so glad our kids are finally able to utilize our backyard, & I'm even more thrilled that the neighbor kids want to join them!

I'll be sharing here:


LinkWithin

Related Posts Plugin for WordPress, Blogger...