It seems like formal dining rooms are becoming a thing of the past, as more people opt for larger eat-in kitchens where guests can be closer to the cook. I noticed this trend slightly after purchasing a home with both a formal living room & dining room! That’s alright though, we use our formal dining room on a fairly regular basis. Occasionally for when we host a large group of family & friends, but most often as a place to work puzzles & sew!
This room was one of the first in our house that set the tone for my new decorating style. After installing wainscoting & chair rail, I coated the walls in Dusty Trail paint & filled the room with a table & buffet from Craigslist.
I don’t think I really loved the room until I added the sunburst mirror over the buffet.
The pop of color in the orchid helped too!
I made my own table runner to cover a flaw on the table & added some cheap accessories for the top.
I also created some inexpensive & colorful artwork for the large blank wall opposite the buffet.
A lone chair sits in the corner, & someday I hope to have colorful plates hung above it, but that will have to wait until I find the perfect ones!
It’s amazing how a room can go from this:
to this:
with just paint & accessories (okay, & trim work too).
For more information on the project & sources from this room, please visit this post.
I hope you’ll stop back next Tuesday for another room tour!
Home Tour: The Living Room
This past summer, I finished up making over our living room. When we had first moved in, it held the furniture from our old living room, which didn't fit the style of our current house.
The makeover began by purchasing the Carmen Sofa from Pier One & a cheap coffee table I spray painted gold.
I made my own pillows…
and made artwork from free printable images.
An old china cabinet got a new life with a coat of paint & some mirrored glass,
and I tackled my first re-upholstery job on an old pair of chairs.
I refinished my great-grandmother’s table & learned how to style it.
And then my husband & I reupholstered a $40 pair of antique chairs with drop cloths.
We are still pretty proud of ourselves!
If you need a refresher, here is how the room looked after we moved in:
And here it is today:
To find links to all the projects & sources for this room, click here.
Thanks so much for joining me on today’s room tour! I hope you’ll stop back on Thursday to see more of the dining room.
Home Tour: The Study
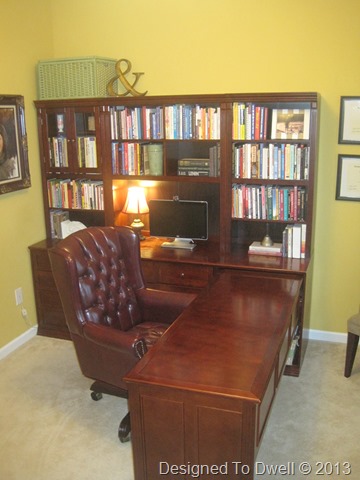
The tour of our home continues with one of the first rooms you see when you walk in the front door, our study.
This home office has come a long way since it’s first makeover several years ago. What was once a dark, outdated room, is now a cheerful spot for us to work & study.
The transformation began by detaching part of our “L” shaped desk & building the “X” base desk in front of the windows.
My son mainly uses this spot for his homework, but it’s nice for my husband to have a place at home to work on his laptop if he needs to.
The remainder of our once “L” shaped desk was painted white to brighten the space.
Since the room is small & lacks a closet, magazine & file storage was added above the bookshelves. Some paint & decorative tape dressed up cheap Ikea storage bins.
The shelves are mainly styled with our books. Despite being mainly filled with paperbacks, I still think the shelves look pretty.
I achieved this by choosing to leave a few shelves open for styling, & laying some books horizontally to break up the books.
I totally forgot that I was using one of the vases (below) in the family room! I didn't notice it until I went to take the following photo!
I am still loving the Ikat bulletin board we made to go behind the computer monitor. The “drawer” below the monitor is a pull-out tray for the keyboard & mouse.
When we removed the writing desk, we had to find something to do with the base piece. I decided to use more Ikea storage boxes to stash my craft supplies.
The small loveseat fits the space perfectly & provides a comfy spot to relax.
In case you didn't see what the space looked like before, here it is:
It’s hard to believe the only new furniture we purchased was the desk chair to achieve the look below:
For more information on the sources used in this room, please visit the original post here.
The tour continues next Tuesday!
I'm linking up for the Best of the Nest at Driven by Decor! Please stop by & check out some awesome projects!
Home Tour: The Entry
After almost four years of blogging, I am finally putting together a legitimate home tour for you all! In November, my husband bought me an early Christmas present: A DSLR camera! Since I finally have a camera that takes quality photos, I figured it was time I re-take pictures of all the decorated spaces in our house to create a tour. When I have re-revealed all the spaces, I will make a “Home Tour” tab at the top of the page.
I figured the tour should start in the entryway, but first, here is an older (non-DSLR) picture of the exterior:
I took this picture after we painted the front door black & added some new lighting outside.
When you step inside, you’ll be greeted with this cheerful dresser (The color in the image above isn’t very accurate. It’s more of a gray/blue color than a baby blue!) and a sea of linoleum, that we will hopefully be replacing with hardwood flooring in the next few years.
I printed off some stock images of doors to create some unique art for the entry.
We painted the walls, Toasted Almond, by Olympic & added chair rail & wainscoting to make the entry feel more formal. Someday I hope to have a prettier door, but for now the black paint dresses it up a bit.
I made some more art with pictures of our first & current home on the waterlogue app. (I don’t know why this picture turned out so blurry… Obviously I am still trying to figure out my camera!)
Another project still on the list for this space is to add some different newel posts & stain the orange-y oak railings a darker color.
Here are a couple of pictures of the upstairs hallway. Not all that interesting, but it gives you an idea of the layout.
To see links to all the projects for this space, click here. Thanks so much for stopping by! I’ll be back Thursday with an updated tour of our study!
My Parents’ Christmas Home Tour: The Main Floor
As I have mentioned several times on the blog, my parents LOVE Christmas. Growing up, our home was always completely decked out for the holiday, & it looked so pretty it usually stayed up until at least Valentine’s Day (or maybe that was just because it took so long to take down)! While we visited for Christmas, I decided to take some pictures of their house decorated for the season. I know it’s crazy of me to be posting these photos now that Christmas is over, but I figured I would forget I had the pictures if I waited until next year. So, here goes…
The Entry/ Living Room
Above is the view when you walk in the front door. My parents host a lot of parties throughout the month of December, which is why their large entry is filled with tables & chairs.
The Dining Room
The Sunroom
The Breakfast Nook
I hope you enjoyed the tour! Sorry for the slightly blurry images. I’m still trying to learn to use my new camera, so hopefully the picture quality will get better throughout the year!
Subscribe to:
Posts (Atom)