Plans for the Family Room

On Monday, I mentioned that I am itching to make some changes to the family room, now that we have our new sofas.  Before the sofas, I had been planning some changes, which were mentioned in my goals for the year, but it turns out that once the sofas arrived, my wants got a little bit bigger!

Danbury Sofa

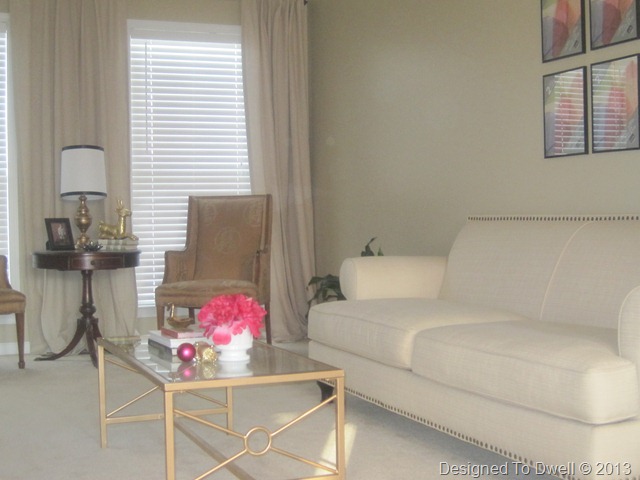
I had been growing tired of the blue walls & was thinking of painting them a more gray-ish blue, but once the sofas arrived I didn't really like how the gold chairs & curtains looked.

New Sofas

The room is plenty big enough for two full-sized sofas, but I felt all the large furniture in the room was making it feel a little heavy.  I’m mainly talking about the TV cabinet, since it is huge!

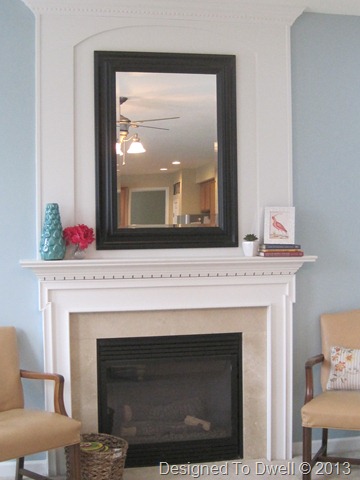
I feel that if we mounted the TV above the fireplace & added shallow built-ins around it, it would give us the storage we need, without taking up as much visual space.  This could also fix the “what sized coffee table are we going to get with the “L” shaped couch situation?”.  A rectangular coffee table worked fine for the sofa & love seat combination, but I don’t feel it would work for this one.  If we moved the TV, we could situate the couches across from one another, like this.

So, here is my plan for the moment:

OB-Family Room

I’d like to paint the walls Dusty Trail (by Olympic Paints), add some new curtains & pillows, & a round side table between two of these chairs from Overstock.  I’ll replace the toy cubby with some closed storage (maybe a DIY version of the mirrored cabinet above) & hang a gallery wall where the entertainment center used to be.  I also hope to make a DIY ottoman coffee table in the aqua fabric sample.  Of course, this will all only work if I can get my husband to create bookcases flanking the mantel.  I’m thinking something like this (without the closed in TV box).

I am so happy to have new sofas!  I have been day dreaming about creating a new décor plan for this room since we got them, but I realize that these ideas likely won’t come to life for a while (if ever) since we have plenty of other things to spend our money on right now!  Boo!  It is so fun to dream, but I have to remember to keep reality in perspective while doing it!

Family Room


What about you?  Has a new furniture purchase inspired you to make even more changes to a space?  Please tell me I’m not the only one!  My husband is pretty sure I have a problem!

Feel free to check out all my inspiration on my Family Room Pinterest Board!

Our New Danbury Sofas Are Here!

I have been holding my breath over these sofas since October 7th (to be exact)!  We have had some highs & lows over the past three months, & I was terrified they would arrive & I would hate them, since I bought them online without seeing them in person or sitting on them! 

JCP Danbury Sofa

We ended up purchasing two Danbury sofas in Buckwheat, using velvet fabric.  The color is beautiful (not too brownish or yellowish) & the fabric is very soft & doesn't leave butt marks after being sat on!  My kids were a little hesitant to get new sofas, since they really liked rough housing on our old ones, but they love how soft & cozy they were once they sat down.

Danbury Sofa in Buckwheat

There were a couple of problems once they arrived.  First, the seam in one back pillow had come undone.  I quickly fixed the problem with a needle & thread.  I believe the delivery drivers had slightly dirty hands when they handled the sofas & I did notice about three dirty finger marks.  I’m pretty sure they will clean off with water, but the spots aren't that noticeable & I’m too scared to clean them for fear of making a bigger mess!

Velvet Sofa

Despite the un-sewn seam, I do feel like these sofas are pretty solid & will hold up well to the wear & tear of daily use (& abuse) by the kids.

JC Penney Sofa

Having these new sofas has created a slight problem for me.  I have been tiring of the blue & gold for a while now (you know, maybe a week…) & am getting the itch to re-paint & accessorize.  This means, a few new pieces of furniture & possibly built-ins on the fireplace wall.  (Of course, I will have to sweet talk these ideas to my husband!)  On Wednesday, I’ll show you some of my ideas for the space, which more than likely will take a long, long time to come to fruition!

Making a Statement… With Chairs!

Recently, I've been thinking a lot about the living room.  There are only two things left to cross off my list before I can call it “finished” (for now).  I have probably been dragging my feet on recovering these chairs for at least a year & a half!

IMG_8440

I bought the pair for $40 at a local antique store.  I really love the clean lines & exposed wood on them.  I have never seen a pair of chairs exactly like them, which also makes them very special!  After doing a bit of research on the new One Kings Lane Home Décor Resource Page I was able to determine that they are probably some sort of reproduction Louis XVI Bergere chair.  The store I bought them from considered them antique, but I’m not quite sure they are from the 1700’s!  I’m so glad to finally have a little knowledge about this chair. 

If you haven’t checked out the resource page, I encourage you to look at it.  It might take you a few minutes of investigation, but I think you’ll notice that there is a wealth of information there!  Here is another article I found on choosing the perfect statement chair.

Anyway, back to my chair…  I’m really hoping to put my big girl panties on this week & start on these lovelies!  My plan is to re-stain the legs a dark walnut color & cover the chair in canvas.  I think the contrast will look very sharp, similar to this chair:


The canvas fabric will help lighten up this wall & bright pillows will really pop on the chairs!
You may recall that I recovered another set of chairs for the living room over the summer.  I will definitely be looking over that experience so I don’t make any of the same mistakes on these chairs! 

IMG_8428

In case you forgot what the rest of the room looks like, here’s a peek:

IMG_8432

So, do you have any statement chairs in your home?  Have any encouragement for me about recovering chairs?  I would rather just pay someone to do it, but kind of feel like it would be cheating & would rather be saving my pennies for some other projects!  I’m scared!  (What a way to end a blog post!)

DIY Basement Storage Shelves

One of my goals for 2014 is to organize the basement.  To do this, I wanted to add shelving in the future “storage area” of our basement.  Right now, the entire basement is essentially storage, but one day we hope to finish it & it would be nice to have “phase one” out of the way!  So, over Christmas break, my husband made my dreams come true! 

So, here is what the area looked like before the shelves were built:


After we cleared the space, we decided on the length, depth, & height of the shelves.  Based on this, we decided we would have three columns of shelving, three shelves high.  Each shelf was 40” long by 24” deep by 22” high.

First, Mark used 2x4s to create horizontal ledgers to hold the back of the shelf.  (The top of each ledger sits 22” above the floor or previous shelf.)  These boards were anchored into the wall using concrete anchor screws.  To screw these in, you will need to first use a hammer drill to drill a hole through the board, into the concrete.  Then, use a screwdriver to screw in the anchors.  He installed one screw on the end, & then went to the other end, made sure it was level, & added another screw.  Finally, he screwed in the middle.  Mark estimates he used a screw about every 40 inches.

 IMG_8408

The next step was to add the vertical posts.  These were spaced 40 inches apart.  Since our basement is unfinished, Mark used a nail gun to attach them to the ceiling joists. 

IMG_8407

Another view…

IMG_8409

Shelf braces were then added to connect the vertical posts to the ledger boards.  Mark used his nail gun to attach a 26” 2x4 to the ledger board.  Then, after checking to make sure it was level, he nailed it to the vertical post. 

IMG_8410

IMG_8411

IMG_8412

The final step was to nail 24”x40” pieces of plywood into the side braces & back ledger boards to create our shelves.  We used 3/4 inch plywood, since we had some of it on hand, but I would probably recommend 1” plywood if you plan to put a lot of weight on your shelves.

DIY Basement Shelving

Garage or Basement Shelves

DIY Storage Shelves

And here they are nice & full:

IMG_8421

(Umm…  Yes that is a Commodore 64 computer my husband insisted we keep.  Somewhere in there we also have the original Nintendo.  We only have to store them for about 20 more years!  He tells me he wants to tinker with them when he retires…  Really?)

Three previously full corners of our basement have been cleared out & consolidated into one storage area!

IMG_8422

Looking at this makes me feel so good about my goals, but then I turn around & look at the massive amount of things I still need to sort through. (I’ll spare you a picture.)  Let’s just say it would fill our study, entry way, & living room!  The good news is that it’s things we are either donating or selling & some unused furniture we will either get rid of or use when we finish the basement.  I have a feeling I’ll be down here for a while! 

So, have you started working on your home goals?  Anyone still have a 30 year old computer sitting around?  (Please tell me we’re not the only ones!)

Defining My Design Style

In an earlier post, I mentioned that I had finally figured out my decorating style & was learning to incorporate it into my home.  I have enjoyed interior design for as long as I can remember & thought I knew what I was doing when it came to decorating my own home.  It wasn't until we moved in this house & I began blogging that I realized I didn't have a clue!  The family room had a cottage vibe:


The study was strictly traditional:


The upstairs bathroom was a bit whimsical:


I had just began reading home décor blogs when we moved in this house.  This made things even more confusing!  I had become inundated with so many beautiful spaces of all different styles.  At this point, I began making more decorating mistakes!  I would decorate a room & then hate it!  I felt clueless & frustrated. 

At this point, I realized I needed to put a little more thought into what I liked, décor wise.  I began pinning images of rooms that I loved.  Occasionally, I would go through my Pinterest boards & delete anything that I didn’t like.  I studied my favorite rooms & noticed some similarities.  Based on those, I realized that I am still pretty traditional at heart, but with a modern twist.  I appreciate clean lines & neutral colored walls & upholstered furniture.  I like cheerful pops of color, but prefer them in accessories rather than on the walls.  I like classic finishes that will stand the test of time.  Knowing these things has really helped clear up my décor confusion.


To prevent any more design confusion, I also stopped following some home décor blogs that didn’t fit my new found taste.  I felt pretty bad about doing so, but I realized it needed to happen if I wanted to own my style.


Now that I have a pretty good grasp on what I like, I can ask my self questions before buying furniture or redecorating a room to ensure that I stick with my style.  For instance, if I am getting ready to purchase a piece of furniture, I can ask myself:  Does it have clean lines?  Is it a classic style?  Making sure the décor choices fit my style will help eliminate most of my decorating mistakes.


When I finally felt like I had it all figured out, I began making changes to our house to reflect my new found style.


If you are struggling to find your style, I recommend you go through magazines or browse the internet for rooms whose style you love.  Study the rooms closely to find similarities.  Ask yourself questions like:

What is the overall style of these rooms?  (Traditional, Modern, Eclectic, Contemporary, etc.)
How is color used in these spaces?
What types of finishes are used in these rooms?

Once you have answered these questions, it should give you a pretty good idea of things you like.  Make notes about what you like about each space, & remove any spaces that don’t fit your style.  Whenever you are in doubt about whether something fits your décor style, go back through these images & your notes, & see if it fits.

I am definitely not an expert, but I felt that I would share how I came to understand my personal decor preferences.  I would love to know if you found these suggestions helpful or if you have other ways to help interpret your style.  Let me know!

Styling a Round Side Table

This month, I am turning my attention to finishing up the few remaining projects in the three year living room makeover!  First up is a project I actually finished in November, but never got around to posting with the craziness of the holidays.  The current accessories that were on my round side table were just not working for me. 


I still can’t pinpoint exactly what I didn't like about it, but it just seemed too dark & the lamp was a little funky (in a bad way!).  After a trip to Target & Dollar Tree, I feel the table is looking much prettier.

Threshold Lamp

I picked up the lamp & lamp shade at Target.

Cheap Accessories

The gold picture frames came from Dollar Tree.  The flamingo printable can be found here

Styling a Round Side Table

I found the little swan at St. Vincent De Paul a while ago.  It used to sit on our glass coffee table, but Evie started banging it on the glass, so I decided to move it!

IMG_8093

I think the look is much better now!  Next up, recovering the chairs…  (Also, how is it possible that my photography has gotten WORSE??)

Sharing here:
TDC Before and After

2014 Project Goals

I love the fresh start that a new year brings.  Usually, as one year is ending, I am busy dreaming up big plans for the next one!  The idea of starting over & trying to improve my home & self is so exciting to me!  It doesn't all usually come to fruition, but I’m okay with that.  I think just having a general idea of what I would like to accomplish helps my scattered brain know what I need to focus on.  Anyway, before we look at my hopes for 2014, lets take a depressing look at what I accomplished from last year’s goals.

Out of my 11 goals for last year, I accomplished three! 

First, I made over the study to better fit our personalities & style.


Next, we added a few decorative touches to spruce up the patio.


Finally,  I updated the kids’ bathroom.


Projects for 2014

This year, I just want to focus mainly on the function & style of our first floor & finishing those other 8 projects from last year!  So, here’s the plan:

1. Finish up the current living room projects by recovering a set of chairs & accessorizing with new pillows.  (This is an older picture.  I have already added some pillows & art above the couch.  Pretty soon I’ll show you the new accessories on that round table too!)


2. Make a few tweaks to the family room, to better reflect my new found style!  In 2013, I re-styled the mantel & ordered new sofas.  Unfortunately, nearly three months after ordering the sofas, we have encountered one problem after another & have still not received them.  Currently, one is missing.  I’m really hoping for some good news this week, but I won’t be holding my breath.

This year, I want to replace the sofas (see them here), add art above the gold chairs, make some tweaks to the entertainment center, add a console behind the couch, a new ottoman coffee table, & add some additional toy storage.  A new lighter, gray-blue paint color may appear too.  I’m hoping to start knocking these projects off soon, since Christmas has left toy storage at a premium!


3. Change up the morning room to better reflect the style of our home.  To do this, I want to paint the buffet white, replace the secretary for something with cleaner lines, re-accessorize, possibly tweak the chairs, & maybe replace the curtains.  I’m not sure what I’ll actually be able to get done in this room, but I feel that it is the room farthest from my style on the main floor.  (Does that make sense?)  Time to search for inspiration, & learn magic!


4. Add deep shelving in the storage section of the basement.  (Done- See it here!)


5. Beautify the backyard by adding a retaining wall next to the patio & making it a decorative vegetable garden.  (Those exist, right?)  Also, add plantings & make some adjustments near the fire pit area.


6. Paint the front door black & replace the shutters on the arched window (if we still have them).  Possibly add some seating to the front porch.


7. This summer, I hope to make over my kids' rooms.  We bought my daughter a brass bed last year & my son a large vintage map & dresser.  The bed & the map have yet to be installed.  I’d like to paint their walls the same neutral color, add new bedding (they might both be getting full sized beds), curtains, chairs, & a parsons desk for my daughter.  We’ll see if I make it to this, since I’d much rather work on the above 6 items first.


I guess I better get off here & try to convince my husband to help me get all this done… and maybe start looking for a job! 

So, do you set goals for your home every year?  I’d love to know what they are!  Feel free to share in the comments below!

Sharing here:


TDC Before and After

LinkWithin

Related Posts Plugin for WordPress, Blogger...