Paper Doll Art

I wanted to give my daughter some artwork to go on a small wall in her bedroom above her dollhouse.  I came up with the idea to frame some vintage looking paper dolls.

I looked everywhere for paper doll books (dollar stores, Wal-Mart, bookstores, Cracker Barrel, etc.) without having much luck.  One day while searching online, it hit me that I could probably just print some from the computer.  Duh!  Lucky for me, I found the perfect FREE, printable paper dolls through Patty Reed Designs.

My mom had actually made my daughter an outfit with the fabric featuring these paper dolls!


Sorry, but that's the closest picture I have of the fabric!  (I just realized I do have another picture of the shirt here!)

Okay, so back to the art...I found three rectangular plaques at Hobby Lobby for about a dollar.  Then, I painted the edges of the plaques a cream color and decoupaged scrap book paper onto the top.  Next, I printed & cut out a paper doll and two outfits and decoupaged them on top of the scrap paper.  After the top coat of Mod Podge, I lightly sanded the whole thing (including the paint).

Here they are together hanging on her wall.


Here is a close up of the doll:


To hang these, I just added a couple of thumb tacks to the back & wound some wire around them so they would catch onto the nail.  (Does that make sense??) 

I think they turned out darling!  This whole project cost less than $5 and the same ideas could be applied to make artwork with cars, trains, dinosaurs, etc. for boys! 

Feel free to visit Patty Reed Designs & print off some paper dolls for your daughters or their friends!  (Ooh, it just hit me that those would make great party favors!)

What have you made with decoupage?

I'm linking to these parties:


Thanks!

I was so excited this morning when I started checking my blogs to see that Lindsey from Better After featured our entertainment center!  Thanks so much Lindsey!

She features all kinds of before & after pictures.  If you haven't checked out her blog, you should visit.  I'm sure you'll become a quick follower!


Thanks also to those of you who are following this sight!  I really appreciate it as well as your kind comments!

Lamp Revamp

I found this inexpensive lamp for around $15 at Target (I think).


There was nothing wrong with the lamp, but I thought it needed some jazzing up for it's new home in my daughter's room.  I found the perfect solution to dress it up while perusing the aisles of Hobby Lobby.  They had an adorable white floor lamp with pink shade adorned with feathers.  (I wish I had taken a picture of it.)  I was too cheap to buy it and decided to make one like it using items I already had at home.

To re-create it I cut up an old pink boa & paper clipped it to the shade.  I didn't want to damage the shade in case it looked bad or I decided to change it later.


You can see a few of the paper clips in the picture above.  The boa is so full, you don't see them  on the outside of the shade.

Here's the finished product:


I love the way it turned out, & you can't beat the price!

What do you think?

I'm linking up at these parties:

Photobucket

Help Wanted!

I usually only post on Mondays, Wednesdays, & Fridays, but I am making a special posting today because I NEED HELP!

When we had our house built, we ordered a light rough-in for the morning room.  When the electrician came, he was out of light kits & installed a fan kit instead.  That meant we got three light switches instead of two (one for the fan, one for the light, & one for an outlet).  Now, I am okay having a light switch that goes to nothing (we can always connect it to another outlet...) but my husband is not!  We have lived with no light in the room for a year & a half since we haven't been able to agree on a light fixture!  He wants a fan so we don't have a light switch to nowhere, but I still want a pretty light fixture.

I guess it has finally been long enough that he has finally given me the "go ahead" to do whatever I want!  I found this light fixture from Overstock that I really want to use in the room:


I REALLY like this light, but the chain is only about 40 inches long.  In order for the light NOT to block our focal point window (I don't know what else to call it!) it would need to be about 57 inches long.  Here's a picture of the windows, so you can see what I'm talking about:


The forty inch chain would make the lamp shade start about where the arrow is at.

So, here are my questions for you:

1. If the chain can be extended & the shade would start right below the arched window would that look okay or would 57 inches of chain hanging down just look weird?
2. If the chain can not be extended would the fixture be too high if the shade started at the arrow or should I just opt for a standard chandelier that wouldn't block as much of the light as the shade does?
3. Finally, should I just scrap the whole idea of a pretty light fixture & go with a ceiling fan (insert pouty face)?

Ugh...I hate making decisions!

Let me know your thoughts!

Thanks!  I'll get back to showing my daughter's room tomorrow!

To get lots of feedback, I'm linking to:

My Uncommon Slice of Suburbia

Meet Eliana!

This week I will be showcasing snippets of my daughter's bedroom.  Before going into detail about her room, I thought I would go into detail about my Eliana (El-E-ah-nuh....mistaken for Elaina a lot!) Denae!

Eliana (aka Elie, Nay Nay, Elie Belly, etc.) is our super silly, part tomboy, part princess, four year old!  She spends a lot of her time in the bathroom washing various toys (She has ruined many battery-opperated toys!) or making "cakes" or "soups" in the kitchen (The recipes for these usually include yogurt, milk, water, pixie sticks, sprinkles, & bites of apples she takes & spits into the bowl!).

Here are some pictures to better describe Elie...

All of her favorite foods include either lots of sugar or chocolate.


She has an incredible sense of fashion & loves to accessorize:


Don't you love how she wore a swimsuit bottom with tights to create a lovely skirt outfit?
She enjoys life & knows how to make us smile!

Shes does the funniest things & is always entertaining!

I caught her singing into the curling iron one day.  (Don't worry, it was unplugged!)
She is mommy's girl...


Prefers to ride on Daddy's shoulders:


Loves her big brother so much!


She is our beautiful, sweet, little fairy princess and we are so blessed to have her!


Creating Old, Worn Artwork (for FREE)

I needed to create some cheap, easy artwork to hang above my son's bed.  Originally, I was just going to frame pictures of boats, but instead decided to use "boat design plans".

To do this, first find some images you like online & print them out.

Next, wad them in a ball several times to create creases.


Then, smooth them out and paint over them with a mixture of brown paint & water.


Carefully blot the picture with a dry paper towel, being careful not to rub or rip it.


Let it sit until it's completely dry.  (I usually leave mine to dry in the sunshine.)

Here's the final product:


I definitely think it looks better than something printed on a plain piece of paper!  Not too bad for free artwork!  (I already had the frame.)

Happy Easter!

I'll be linking up here:


Bookshelf Turned Dresser

My husband was given this bookshelf after helping a friend move.


It was originally black laminate, but I decided to paint it navy so it would match the other furniture in my son's room.  (That's a whole other messy story though...)  This is a perfectly fine dresser, but I just didn't like the way it was looking in the room.  Unfortunately, we didn't have any other furniture to keep Zeke's fish on, so it had to stay.

One day, as I was sitting in my son's room, trying to come up with a solution to several style problems I was having with it, a light bulb went off!  What if we made long crates to fit on the shelves?  My husband decided that was better than trying to build a fish tank stand, so he set to work!

This is what he made:


It is solid plywood on the bottom & sides.  I added a canvas drop cloth so the clutter inside was kept out of sight.

Here they are on the bookshelf:


Now, I'm actually digging this bookshelf!  It kind of functions like a dresser.  (We could actually add drawer glides & rope handles, but I'm done with it for now!)

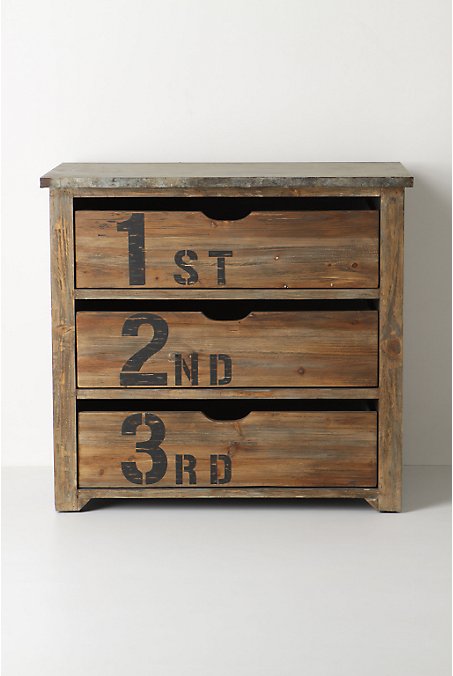
It mimics dresser from Anthropologie, except without the $998 price tag!


Thanks for stopping by!

I'm linking up here:


Photobucket

Furniture Feature Fridays

That's So "Naut" Cool!

(And by that, I mean That's So "Nautically" Cool!)

Several times over the summer our house was being built, I asked my son how he wanted his new room decorated.  He had two requirements.  The first was that he wanted orange walls.  Secondly, he wanted to have pet fish.  Both of these requirements seemed doable to me, so I started searching for a patterned bedding that included the color orange.  I found a great comforter on Overstock by Tommy Hilfiger.  From there, I found the inspiration I needed to finish the room!


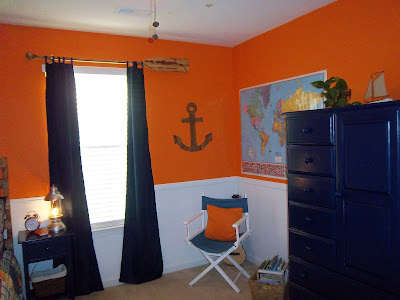
As you can see from the picture above, my son got the orange walls & fish he wanted!  I decided to tame the orange a little by painting the lower half of the wall white and adding chair rail to separate the colors. 

I found the idea for the life preserver/compass on the Rate My Space website. 

You can read about the pallet headboard here.  Above it, I framed ship plans I found online.  One of my favorite things in the room are the Euro pillows I made out of navy blue bandannas.  (I wish I would have taken a close up of those, but it's after midnight, & my son is asleep.  And by the way, if this post doesn't make any sense, it's because I'm writing it after midnight!)

More information on the bookshelf crates can be found here.

The nightstand, lamp, & navy curtains came from Target.


Originally, I had a valance hanging above the window.  I decided I really wanted to hang curtains from an oar, so I changed them out.  I bought the oar from Wal-Mart for about $12.  Then I sanded it down (but not well enough!) & stained it, which gave it kind of a weathered look!  I guess you can call it a happy accident!

I drew an anchor on a piece of plywood and had my husband cut it out with his jigsaw.  Then, I sanded & stained it and hung it on the wall.  It's not perfect, but it didn't cost us a penny since it was made out of items we had on hand.

Of course, we had to add a map for both thematic & educational purposes!


You can read more about the desk here.  My husband built a bench to go under it. 

I saw the idea to hang clip boards in the Restoration Hardware kids catalog.  The two on the end hold Zeke's artwork & the one in the middle holds a calendar.


I guess it's time to dock this boat & get to bed!  I hope you enjoyed this "three hour tour"!  (Great, now I'm gonna be singing the theme song to Gilligan's Island all night!)

I'm linking this post to:

http://betweennapsontheporch.blogspot.com/

http://www.myuncommonsliceofsuburbia.com/

Roomspiration Blog Hop at All Things Bright & Beautiful

HOUSEography House Tour Link Party    

Pallet Headboard

I wanted my son's bed to have a headboard.  Originally, the plan was to have my husband replicate one I had seen in the Restoration Hardware Babies & Kids catalog. 


Wow, that's not a very good picture!  Anyway, one night, I had the idea to create a headboard that looked like a pallet. 

My husband went along with the idea & agreed to build one to the measurements of the bed.

Here's the rundown of what he did:

1. First, he cut two 2x3's 52 inches long.  He used these as the ends of the bed frame.
2. He spaced these boards evenly apart with the skinny sides up and connected them near the bottom with another 2x3 that was 37 inches.  (When the project was complete, this was the board he bolted into the bed frame.)
3. Next, he cut one 2x3 30 inches long.  This one went in the middle, again, with the skinny side up.
4. Finally, he cut 1x4s into 40 inch slats & hammered them to the 2x3s, three inches apart.

Here's the finished product, after it was stained:


And here it is on his bed:


Well, that's it!  Come back Monday to see how the whole room comes together!  (I'm hoping it looks good enough to show you by then!)

I'm linking to these parties:
Furniture Feature Fridays


LinkWithin

Related Posts Plugin for WordPress, Blogger...